Adding user-defined fields in a pseudo table
You can define a pseudo table directly based on the real fields in a physical table, or define different types of pseudo fields based on them. Let’s look at how to do this through examples.
Enumerated dimension pseudo field
In real-world practices, the value ranges of many enumerated fields are a set of strings. Integers are usually used in physical tables to represent strings, such as DeptID in emps.ctx. They occupy less space and compute faster than strings, but they are harder to understand. To solve this problem, you can use pseudo table’s enumerated dimension pseudo field to define the corresponding relationship between strings and numbers.
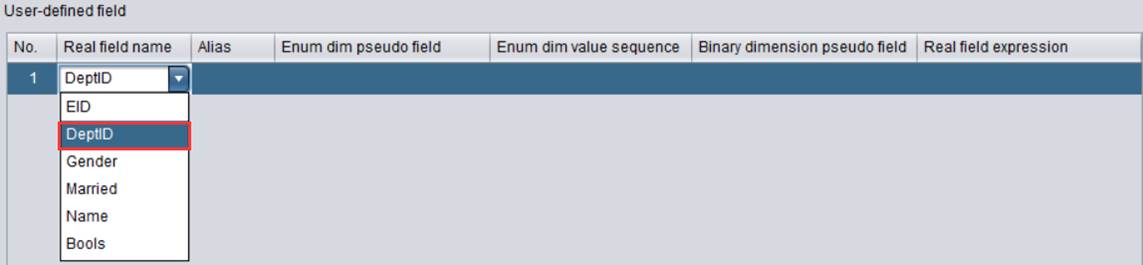
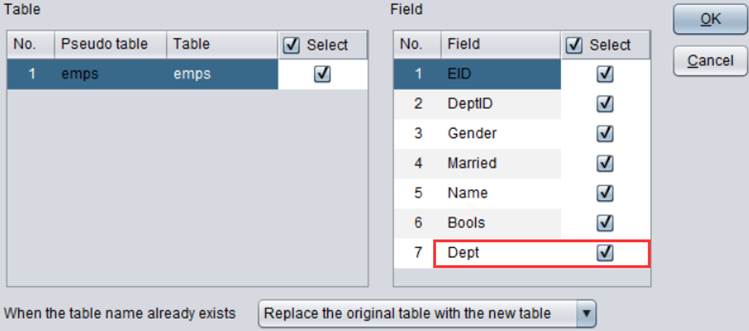
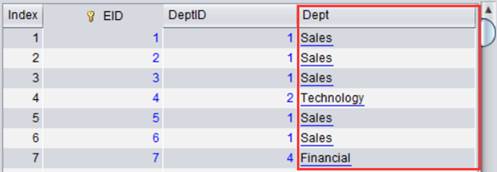
Open demo.glmd created in the previous chapter and add an enumerated field Dept in pseudo table emps to store the department names, which are display values, corresponding to real field DeptID.
Click ![]() button
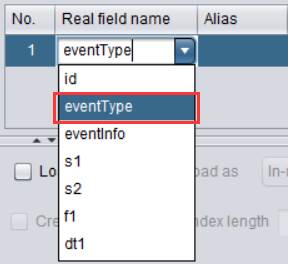
to add a special field under User-defined field. Select DeptID field in the drop-down list under Real
field name:
button
to add a special field under User-defined field. Select DeptID field in the drop-down list under Real
field name:
l Real field name: For setting real field name . A real field is a field in a physical table.
Edit Enum dim pseudo field as Dept:
l Enum dim pseudo field: For setting enumerated dimension pseudo field name .
Double-click Enum dim value sequence:

Configure the enumerated values corresponding to DeptID field. The values start from 1 and match DeptID according to positions, whose numbers are converted to corresponding values.

The above configurations show that DeptID field values 1-5 correspond to Dept pseudo field values ["Sales","Technology","R&D","Financial","Admin"] in order.
l Enum dim value sequence: For setting the sequence of enumerated dimension values. Its corresponding real field contains ordinal numbers, and pseudo field values are members of this sequence.
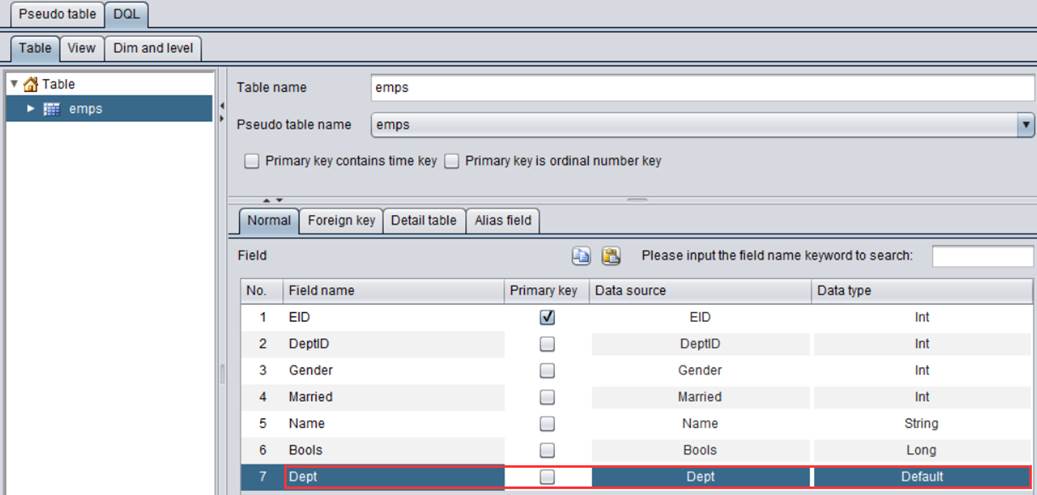
Click “OK” and get the following definition for the special field:
When there are any modifications on pseudo table fields, synchronously update the fields to the DQL table and save the metadata file for queries. There are two sync methods:
Sync method 1: Click Tool - Generate table from pseudo table on the menu bar to re-generate the DQL table:

Below is the newly-generated DQL table:

The method is fast and convenient but it will overwrite the namesake table. If the foreign key is set for the pseudo table, it needs to be redefined after a DQL table is re-generated from it. The method is suitable for a sync when there are many changes on the pseudo table fields.
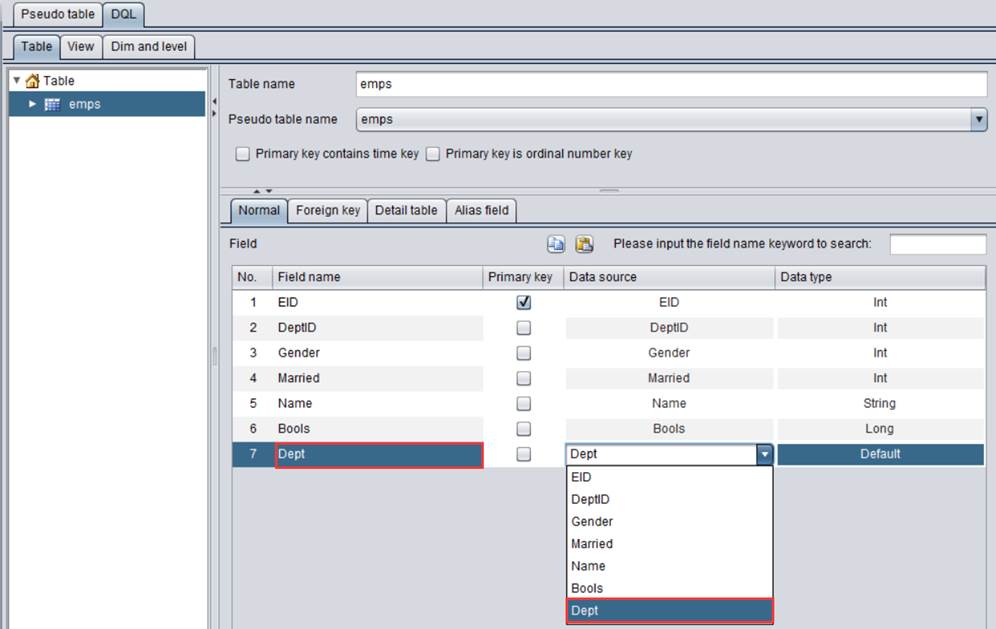
Sync method 2: Switch to “DQL” tab,
click ![]() to add Dept field to the original DQL
table, and select the modified Dept field from the Data source drop-down list.
to add Dept field to the original DQL
table, and select the modified Dept field from the Data source drop-down list.

The method is flexible and is suitable for a sync when there are small changes on the pseudo table, such as adding or deleting one or two fields or renaming fields, which won’t affect the foreign key.
A pseudo field can work as a real field in a DQL query.
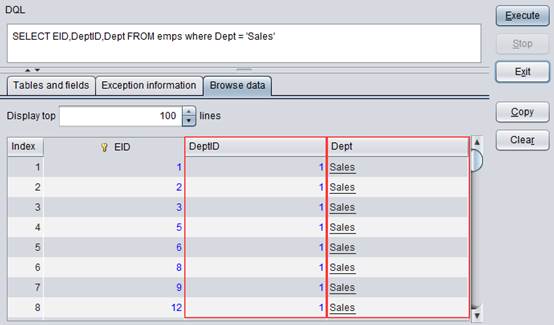
Click Save to save the modifications, execute the DQL query and get the following result:
The string Sales in the filter condition will be automatically converted into 1 for performing a filtering on the physical table.
Binary dimension pseudo field
In real-world business scenarios, certain bool type fields only have true/false values. A binary field (whose value is either 1 or 0) can be used to replace the bool field. When there are many bool fields, they take up a lot of storage resources. In that case, we can use binary dimension pseudo field to integrate the multiple bool fields to optimize storage efficiency.
In emps.ctx, Bools field stores two binary fields of data: Gender and Married. In Gender field, 0 represents male and 1 represents female; in Married field, 0 represents unmarried and 1 represents married. The Bools field values are results of bits(Gender,Married) computation.
Look at how to query data in a binary dimension field. By defining a special field and the mapping relationship between the binary digits and boolean values through a pseudo field, you can add a binary dimension pseudo field name for pseudo table emps’s binary dimension field Bools. Later, you can query and filter data using the pseudo field name conveniently.
Open demo.glmd and click ![]() button
to add a special field under User-defined field. Select Bools field from the drop-down list of Real field
name:
button
to add a special field under User-defined field. Select Bools field from the drop-down list of Real field
name:
Double-click Binary dimension pseudo field:

l Binary dimension pseudo field: For setting binary dimension pseudo field name and can store 32 binary fields at most. Set the names according to the corresponding real fields from low to high order. Values of each field are Boolean false or true values.
Set up binary dimension pseudo field names for Bools:
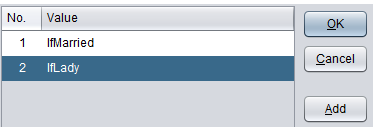
That is, both IfMarried and IfLady have true or false values.
Click OK and we get following special field definition:
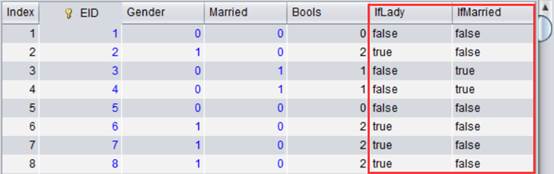
As there are changes about the pseudo table fields, update the modifications to the DQL table and then perform the query. Below is the result:
The above screenshot shows the correspondence between Married/Gender fields and IfMarried/IfLady fields, whose values are boolean.
IfLady in the filtering condition will be automatically converted into the second bit of Bools field value for filtering the physical table.
We can set multiple values under “Alias”, which is the list of pseudo field aliases, to make IM1 and IM2 the aliases of IfMarried and IL1 and IL2 the aliases of IfLady.

l Alias: For setting the list of pseudo field aliases. A string value means giving aliases to binary dimension pseudo field names or real field expressions. We can set multiple values to represent multiple aliases of each bit. When the value is an expression, return result of computing the current expression, as Section Alias type pseudo field shows.
Below is result of DQL query:
Redundant field
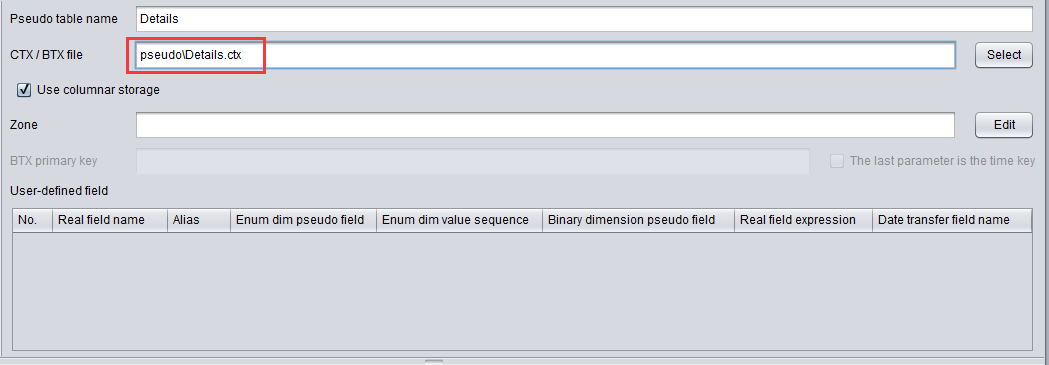
In order to optimize query performance, we create redundant fields in some tables in the real-world practices. For instance, Details.ctx has a record type field custInfo that stores comment, which is information of the client in the current transaction. You need to read the whole custInfo field when trying to get custInfo.comment, even if the other fields do not participate in the computation. To reduce the amount of data to be retrieved, you can add a redundant field custInfoComment in the physical table to store custInfo.comment values.
Below is content of Details.ctx:

However, we need to specifically describe the relationship between the redundant field custInfoComment and the record type field custInfo.comment. To tackle this problem, pseudo tables provide redundant field mechanism, which defines an expression exp for the redundant field. exp will be automatically replaced with the corresponding redundant field if it is involved in a relative computing expression.
Create a metadata file test.glmd and click “Add
pseudo table” icon ![]() to add a pseudo
table.
to add a pseudo
table.
Select under “pseudo” folder:
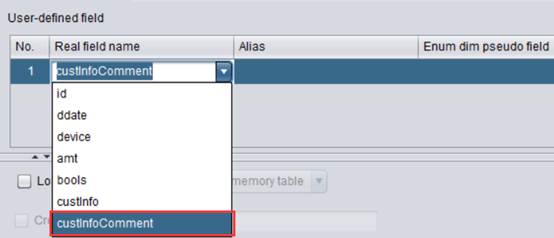
Click “Add” icon ![]() to add a
special field under “User-defined field”; and select custInfoComment field in
the drop-down list of “Read field name”:
to add a
special field under “User-defined field”; and select custInfoComment field in
the drop-down list of “Read field name”:

Edit Real field expression and set it as custInfo.comment:
l Real field expression: Set real field expression.
As we finish defining a pseudo table, we’ll export the pseudo table definition to a SPL file.
Click “File - Export pseudo table to SPL” to export the pseudo table definition to a SPL file. Then open the .splx file in esProc:
|
|
A |
B |
|
1 |
=[{name:"Details",file:"pseudo/Details.ctx", zone:null, column:[{name:"custInfoComment", alias:null, enum:null, list:null, exp:"custInfo.comment", bits:null, date:null}]}] |
=pseudo@v(A1) |
Click “Execute” button to execute the SPL file and view the computing result in A1, which is the pseudo table definition. You can double-click “column” to view the redundant field definition:

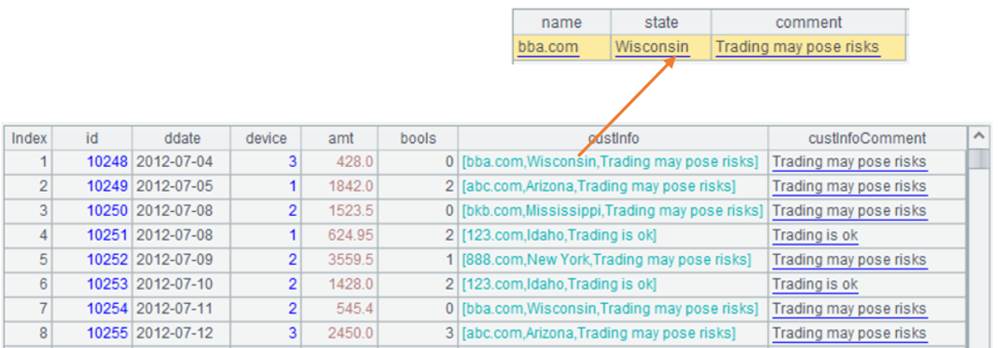
Use redundant field to get data containing "risk" from custInfo.comment strings:
|
|
A |
B |
|
|
1 |
=[{name:"Details",file:"pseudo/Details.ctx", zone:null, column:[{name:"custInfoComment", alias:null, enum:null, list:null, exp:"custInfo.comment", bits:null, date:null}]}] |
=pseudo@v(A1) |
Define a pseudo table |
|
2 |
=B1.select(pos(custInfo.comment,"risk")) |
|
|
|
3 |
=A2.import() |
|
|
Below is A3’s result:
A1 defines an expression exp: "custInfo.comment" and the corresponding real field custInfoComment. When the filter condition in A2 contains the defined expression exp, SPL will not retrieve records under custInfo and then their fields. Instead, the expression is directly replaced with the real field custInfoComment and participates in the subsequent computation using the redundant field values.
To append, modify and delete data to/in/from the composite table, just modify the SPL script.
For instance, to append data in details_new.btx, which has custInfo field but doesn’t have custInfoComment field, to Details.ctx (Following is details_new.btx):

The SPL script is as follows:
|
|
A |
B |
|
|
1 |
=[{name:"Details",file:"pseudo/Details.ctx", zone:null, column:[{name:"custInfoComment", alias:null, enum:null, list:null, exp:"custInfo.comment", bits:null, date:null}]}] |
=pseudo@v(A1) |
Define a pseudo table |
|
2 |
=file("pseudo/details_new.btx").cursor@b(id,ddate,device,amt,bools,custInfo) |
|
Retrieve data as a cursor |
|
3 |
=B1.append(A2) |
|
Append data |
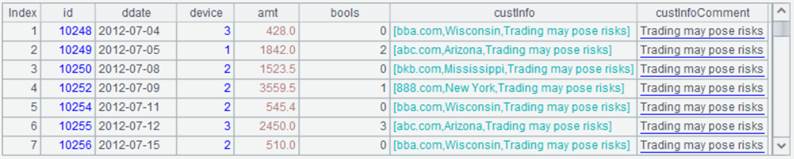
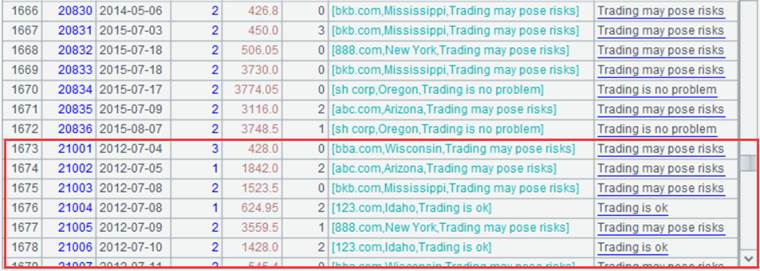
Execute the script, during which SPL automatically converts the pseudo field and generates custInfoComment. Below is the Details.ctx after data is appended:

Alias type pseudo field
In real-world cases, a real field has different meanings in different scenarios. You can use field aliases to specify the specific business meanings in pseudo table’s user-defined definition.
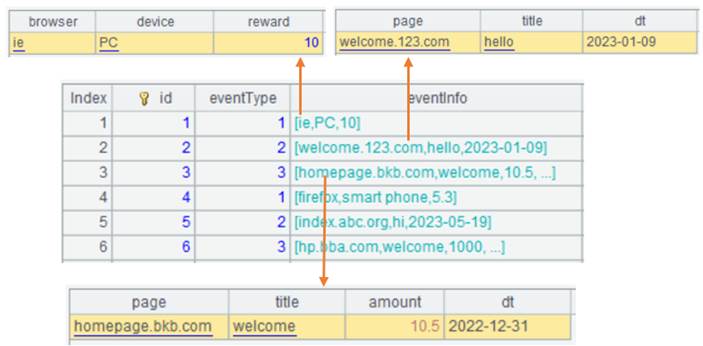
Take e-commerce system event table (Events.ctx) as an example. In the table, each row corresponds to one event and each event stores event type (eventType) and property information of this type of event (eventInfo). eventInfo field is record type and contains multiple fields to store multiple properties.

Note that different types of events have different properties and same type of events have same properties. This means that eventType field value determines the number, names, and data types of fields under eventInfo record.
Below is the relationship between eventType and properties of eventInfo:
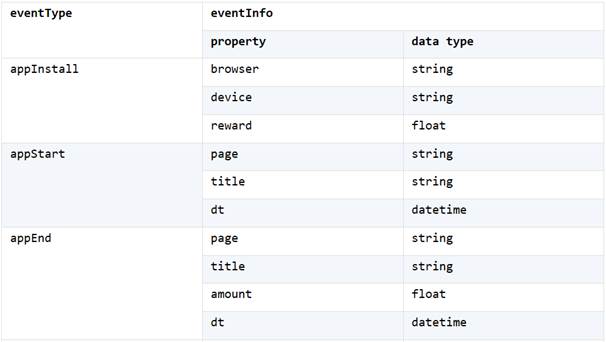
According to the above table, event type appInstall has three properties and appEnd corresponds to four completely different properties. Since there are a lot of event types and if we store each property as a field, there will be too many fields in the physical table. In fact, the number of properties each event type has is not too many.
One event can only correspond to one event type. Suppose an event is appInstall type and has a browser property, it is impossible that it has the page property under appStart type. Yet both are string, and we can use one real field s1 to store the two properties.
In this way, we can merge all properties of same data type, as the following image shows:
As the above shows, real field s1 is used to store the three string type properties – browser, page and page under three event types. Besides, real fields s2, f1 and dt1 are defined to store properties of different data types respectively. In general, the four fields – s1, s2, f1 and dt1 are enough to store all properties listed above.
Now the physical table’s structure is as follows:

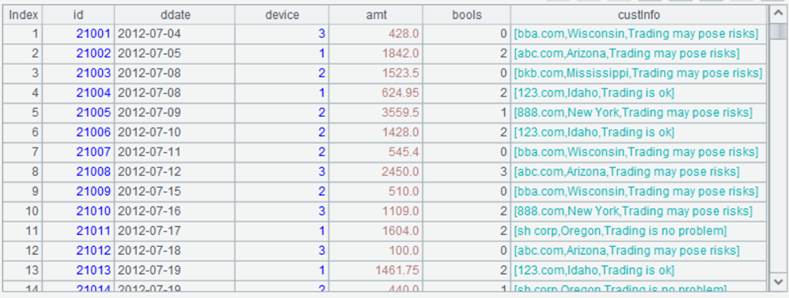
And data in the physical table is:

Though the number of fields in the physical table becomes much less, the field names do not imply any business meanings and are inconvenient to use. We need to interpret the field names according to eventType during the query, which makes coding more complicated.
To deal with this problem, we can use pseudo table’s field aliases and expression exp together. In the pseudo table, we specify multiple aliases having business meanings for each real field.
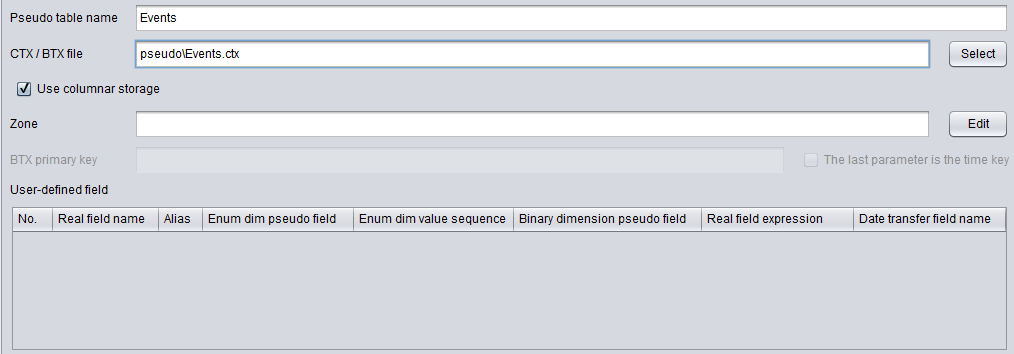
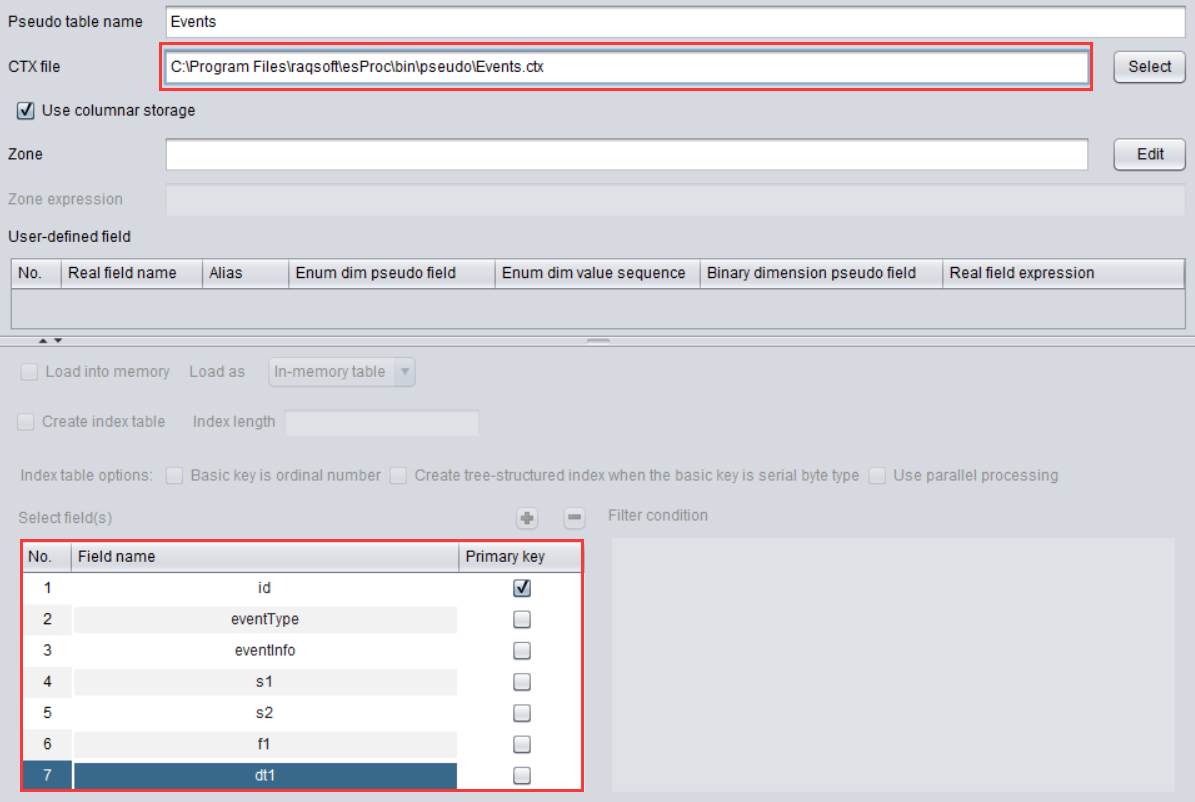
Step 1: Create metadata file test.glmd and click
“Add pseudo table” icon ![]() to add a
pseudo table.
to add a
pseudo table.
Select Events.ctx under “Pseudo” folder:
Now “Psudo table name” automatically retrieves the file name.
Step 2: Click add icon ![]() to add a
special field udner “User-defined field”. Select eventType field in the
drop-down list of “Real field name”:
to add a
special field udner “User-defined field”. Select eventType field in the
drop-down list of “Real field name”:

Edit “Enum dim pseudo” field and set its value as eventTypeString:
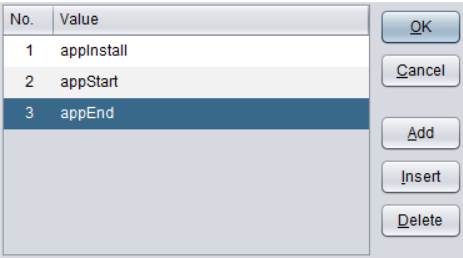
Double-click “Enum dim value sequence”:
Set up the enumerated values corresponding to eventType, which start from 1 and match by position. Each number will be converted to the corresponding value.
The eventType values 1-3 correspond to ["appInstall","appStart","appEnd"] respectively.
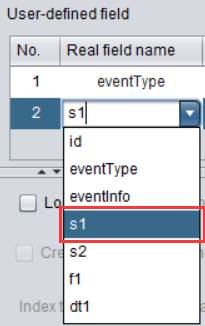
Step 3: Click “Add” icon ![]() to add another
special field under “User-defined field”. Select s1 field in the drop-down list
of “Real field name”:
to add another
special field under “User-defined field”. Select s1 field in the drop-down list
of “Real field name”:
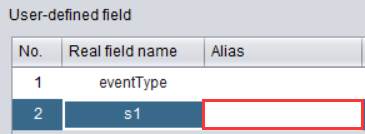
Double click “Alias”:
Set multiple values in alias pseudo field list: ["browser","appStart_page","appEnd_page"].
Edit “Real field expression” value as case(eventType,1:eventInfo.browser,2:eventInfo.page,3:eventInfo.page) and return the corresponding field in eventInfo according to the eventType value:
The Alias list correspond to the three cases defined under “Real field expression”, which gives aliases to the real field expressions.
Step 4: Add the third special field under “User-defined field” according to step 3.

As the pseudo table is defined now, we’ll export the pseudo table definition to a SPL file.
Click “File - Export pseudo table to SPL” on the menu bar to export the pseudo table definition to a SPL file and open the .splx file in esProc:
|
|
A |
B |
|
1 |
=[{name:"Events",file:" pseudo/Events.ctx", zone:null, column:[{name:"eventType", alias:null, enum:"eventTypeString", list:["appInstall","appStart","appEnd"], exp:null, bits:null, date:null}, {name:"s1", alias:["browser","appStart_page","appEnd_page"], enum:null, list:null, exp:"case(eventType,1:eventInfo.browser,2:eventInfo.page,3:eventInfo.page)", bits:null, date:null}, {name:"s2", alias:["device","appStart_title","appEnd_title"], enum:null, list:null, exp:"case(eventType,1:eventInfo.device,2:eventInfo.title,3:eventInfo.title)", bits:null, date:null}, {name:"f1", alias:["reward","amount"], enum:null, list:null, exp:"case(eventType,1:eventInfo.reward,3:eventInfo.amount)", bits:null, date:null}, {name:"dt1", alias:["appStart_dt","appEnd_dt"], enum:null, list:null, exp:"case(eventType,2:eventInfo.dt,3:eventInfo.dt)", bits:null, date:null}]}] |
=pseudo@v(A1) |
Click “Execute” to execute the SPL script and view A1’s result, which is the pseudo table definition. Double-click “column” to view the special field definition.

Perform filtering operation:
|
|
A |
B |
|
|
1 |
=[{name:"Events",file:" pseudo/Events.ctx", zone:null, column:[{name:"eventType", alias:null, enum:"eventTypeString", list:["appInstall","appStart","appEnd"], exp:null, bits:null, date:null}, {name:"s1", alias:["browser","appStart_page","appEnd_page"], enum:null, list:null, exp:"case(eventType,1:eventInfo.browser,2:eventInfo.page,3:eventInfo.page)", bits:null, date:null}, {name:"s2", alias:["device","appStart_title","appEnd_title"], enum:null, list:null, exp:"case(eventType,1:eventInfo.device,2:eventInfo.title,3:eventInfo.title)", bits:null, date:null}, {name:"f1", alias:["reward","amount"], enum:null, list:null, exp:"case(eventType,1:eventInfo.reward,3:eventInfo.amount)", bits:null, date:null}, {name:"dt1", alias:["appStart_dt","appEnd_dt"], enum:null, list:null, exp:"case(eventType,2:eventInfo.dt,3:eventInfo.dt)", bits:null, date:null}]}] |
=pseudo@v(A1) |
Define a pseudo table. |
|
2 |
=B1.select(eventTypeString=="appInstall" && browser=="firefox") |
|
|
|
3 |
=A2.import(id,eventTypeString,browser,reward) |
|
Retrieve filtering result. |
A3’s result:
There is a field alias in the filter condition in A2. SPL will not retrieve the records under eventInfo and then their fields. Instead, it automatically replaces it with the real field s1 and uses the redundant field value for subsequent computations.
To append/modify/delete data to/in/from the composite table, just modify the SPL script.
For instance, you append data of events_new.btx, which has eventTypeString field and eventInfo field, to Events.ctx. Below is data of events_new.btx:
SPL script is as follows:
|
|
A |
B |
|
|
1 |
=[{name:"Events",file:" pseudo/Events.ctx", zone:null, column:[{name:"eventType", alias:null, enum:"eventTypeString", list:["appInstall","appStart","appEnd"], exp:null, bits:null, date:null}, {name:"s1", alias:["browser","appStart_page","appEnd_page"], enum:null, list:null, exp:"case(eventType,1:eventInfo.browser,2:eventInfo.page,3:eventInfo.page)", bits:null, date:null}, {name:"s2", alias:["device","appStart_title","appEnd_title"], enum:null, list:null, exp:"case(eventType,1:eventInfo.device,2:eventInfo.title,3:eventInfo.title)", bits:null, date:null}, {name:"f1", alias:["reward","amount"], enum:null, list:null, exp:"case(eventType,1:eventInfo.reward,3:eventInfo.amount)", bits:null, date:null}, {name:"dt1", alias:["appStart_dt","appEnd_dt"], enum:null, list:null, exp:"case(eventType,2:eventInfo.dt,3:eventInfo.dt)", bits:null, date:null}]}] |
=pseudo@v(A1) |
Define a pseudo table. |
|
2 |
=file("pseudo/events_new.btx").cursor@b(id,eventTypeString,eventInfo) |
|
Import data as a cursor. |
|
3 |
=B1.append(A2) |
|
Append A2’s data to B1. |
Execute the script and SPL automatically generates s1 and f1 according to eventTypeString and eventInfo. Below is Events.ctx after data is appended:
Date transfer pseudo field
In real-world business data tables, values of a date-related field aren’t necessarily intuitive date strings. A commonly seen storage format is the number of days computed based on base date 1970-01-01.
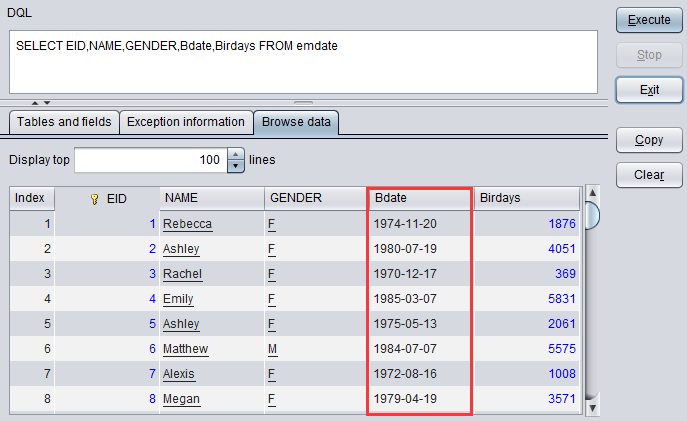
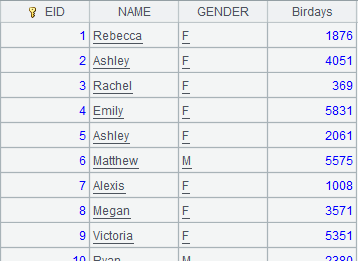
For example, Birdays field in emdate.ctx stores data in this day count format. Below is the original content of this table:
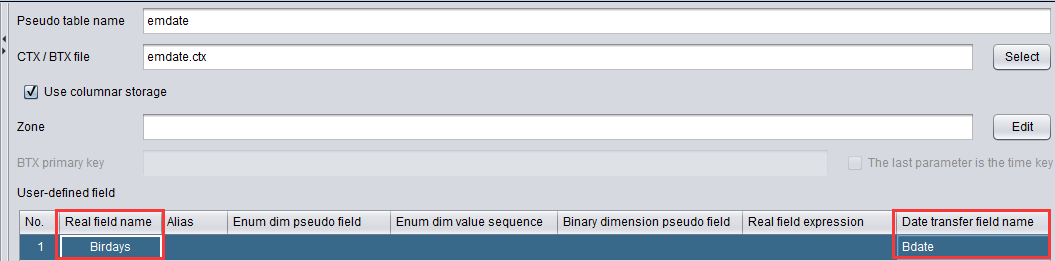
To convert field values stored in day count format to easy-to-read, standard date strings, we can add a date transfer pseudo field in the pseudo table according to the following directions:
Create a new metadata
file t4.glmd, click Add pseudo table icon ![]() to add a pseudo
table. Select emdate.ctx mentioned above and click Add icon
to add a pseudo
table. Select emdate.ctx mentioned above and click Add icon ![]() to add a user-defined
field. Select Birdays field in Real field name drop-down list and set date
transfer pseudo name as Bdate:
to add a user-defined
field. Select Birdays field in Real field name drop-down list and set date
transfer pseudo name as Bdate:
After the configruations are finished, the pseudo table is transferred to a DQL table. Then query data in the DQL table and we c an find that values of Bdate field become date strings, as shown below: